See what I did there? No? Well, you might get it later.
Lesson 4 on mybringback was all about setting up a layout via a XML file. Good video and I learned some things. Including the fact that linear and relative layouts are different. I learned this the hard way as I tried to follow along in Android Studio while mybringback used eclipse. In eclipse the default layout file created a linear layout whereas AS created a relative one. Of course I didn’t notice it for a while and nothing was working properly. Once I changed over to a linear layout my layout suddenly looked like his. I’m having some trouble with the layout working (or not working) on Extra Large screens like the Nexus 10. It appears it has a seperate xml file, but I couldn’t get it to work properly. I think it also led into another problem I’ll get to in a minute.
After my mybringback showed me how to center a textview, I decided to figure out how to do the same with my button. I though it would be to add a gravity tag, but it turns out it needs to be layout_gravity for a button instead of just gravity like for the text. Next I made a really quick and ugly background image to add to my layout. I had all kinds of rendering issues with it. Mybringback showed to put the image in the res/drawable folder, but I seemed to have 4 different res/drawable folders(drawable-hdpi, drawable-mdpi, drawable-xhdpi, drawable-xxhpdi) so I stuck my background into the drawable-hdpi folder and then tried to get it to work using android:background=”@drawalbe-hdpi/background1″ It didn’t work. Eventually I tried it exactly as mybringback had it, which was android:background=”@drawable/background1″. This taught me that you don’t need to point to the specific screen density. I imagine this means that I should build the background to all screen sizes in the future and simply name them the same put in the appropriate folder. That would probably make the image look a lot better than it does on some of the screen sizes in the layout preview. A lot of them looked very stretched and distorted. I’ll keep that in mind for the future.
It was at about this point that I ran into a major issue. I went to run my app in my Nexus 7 Emulator and got errors. I’m still not sure what they meant or why they happened, but I ended up with a “Schema” problem. Android Studio said that the URI was not registered. A little looking around on stackoverflow told me this was a somewhat common issue (bug?) in the Intellij IDE on which AS is based. The only thing I could find to do was create a new project and copy over my files from the first one. This fixed my problem but was annoying. I hope it doesn’t happen again. I also hope it wasn’t caused by something I did. One error message makes me think it had something to do with the xlarge layout file I had. When I got that sorted I moved onto the next lesson.
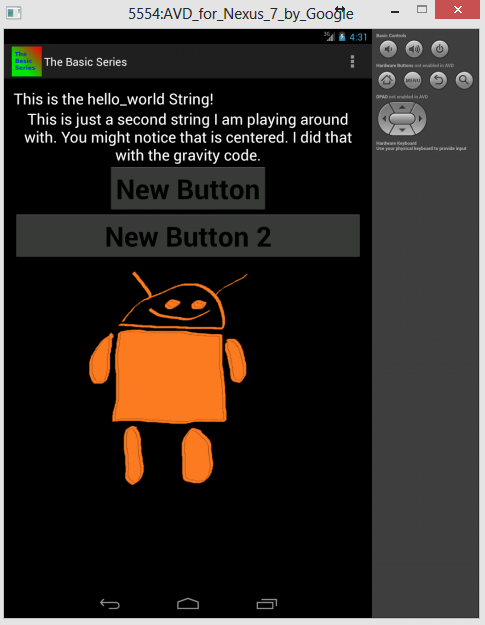
My App after lesson 4
Lesson 5 from mybringback was more of the same, only without the XML file this time. By the way, did you get the title of this blog yet? “Code Monkey Gets Gooey” Gooey… GUI… Graphical User Interface. Yes, it’s a lame pun, but blogs are tough to title, OK? Graphically editing the GUI was pretty straight forward. The biggest thing I learned was that in AS you must right click on or in the res/layout folder in order to create a new xml layout file. For some reason I kept clicking other places and couldn’t figure out why I wasn’t getting the right option. At the end of the video he gave the homework of creating a new logo for the app so I finally installed GIMP and made a quick and ugly logo.
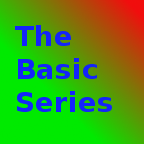
My Quick App Logo
I’m going to take the rest of the night off and spend time with my baby girl. If she has a nap I might work on a nicer background image.
